This page contain some additional tips and tricks to help you get the most out of your Steyr Scout Rifle. They have been submitted by Scout owners or the factory and are published here for your enjoyment.
These tips and recommendations are furnished with the understanding that you use them at your own risk. No warranty as to their usefulness or accuracy is expressed or implied. Neither Steyr USA, nor Steyr Mannlicher, AG, nor anyone else accepts any responsibility or blame for any damages, or if things don't work right, or if you damage your rifle in any way. Before doing any work with the rifle ensure that the rifle is unloaded and that all magazines are removed.
If you discover a idea or product that you think would benefit other Steyr Scout owners please email your idea by clicking here and I'll consider it for posting here along with a credit line.
Because of numerous graphics this is a slow loading page. MS FrontPage says 120 seconds at 28.8kb.
On This Page
| Left Handed Cartridge Carrier Modification | Ammunition Warning | Steyr Scout Zeroing Target |
| Cartridge Carrier Looseness | Cartridge Carrier Screw Modification | Cleaning Rod
Guide ![]() | Leopard Light
& Rail Adapters
| Leopard Light
& Rail Adapters ![]() |
|
| Sighting Trick | Stock Spacer Removal | Firing Pin Spring Adjustment |
| Bolt Collar Alignment | Screw Tightening Specifications | Bolt Technique |
| Sling Installation | Scope Lens Covers | Reserve Magazine Retention |
| Back to the first Tips & Tricks Page |
Left Handed Cartridge Carrier Modification
The butt stock cartridge carrier can easily be modified for the left hand side of the rifle by removing the left stock insert and drilling holes through the indentions that are located on the inner side of the insert. This lines up perfectly with the 2 screw holes located in the stock and cartridge carrier. This allows the use of the carrier by left handed shooters without getting hit in the cheek by the rounds stored in the carrier. (Now if they'd just make the Scout in a left handed version.)
Thanks to Jon Sabia for this tip
Ammunition Warning
A correspondent reported having brass scraping problems on the base of the cartridge case in his Steyr Scout with Samson/IMI "match" ammo. Other brands of ammunition worked just fine. He sent me some cases and what I found was that the thickness of the rim is out of specification by a fair amount on the Samson/IMI ammo. SAAMI specifications call for a rim thickness of .054" +0, - .010 according to my data sheet.
The Samson ammo had a rim thickness of .056 to .059 which puts it between .002" and .005" too thick on the samples. Interestingly the scrape mark was more pronounced on the case with the thickest rim and over the thickest area on the samples. Remington cases supplied by the correspondent had a rim thickness of .054" - .055". In addition, one of the provided Samson cases had a primer that had started to flow around the firing pin tip which indicated MAJOR high pressure since the Steyr has a fairly small diameter firing pin tip.
Another interesting thing is that the IMI cases carry the NATO "cross in circle" mark and an IMI 95 headstamp but no "match" headstamp. The NATO mark is supposed to indicate that the ammunition meets NATO interchangeability specifications but since there is no such thing as NATO "match" ammo I suspect that this stuff is made up from over runs of cases for ball ammo or is "grade 2" cases that didn't meet the specs and which were pushed off on the commercial market for unsuspecting buyers. The boxes the ammo came in are the standard blue and white Samason commercial ammo boxes and are marked ".308 Win 165 Grain MATCH J.H.P-B.T." and had a lot number of "00706/G."
Similar problems have been reported with this ammo in other brands of rifles by correspondents so it is definitely an ammunition problem and not a problem with the Steyr Scout. If you have any of this ammunition I would caution you to check it carefully before using it.
Zeroing Targets for the Steyr Scout
A nifty zeroing target for the Steyr Scout was recently sent to me. As you know the thick reticle can make precise zeroing difficult on a standard target. This target insert was designed to overcome that problem. At 100 yards there will be just a sliver of white showing on either side of the horizontal and vertical thin sections of the cross hairs when they are properly centered. All you need to do is to center your group between 2.8 and 3.0 inches high at 100 yards to get an optimal zero for the .308 Winchester. I have also made a 200 yard insert that works similarly.
These targets are available in MS Word 97 format for downloading along with data on zeroing the Steyr Scout in .308 Winchester in a "zipped" archive format. Click here to download the "Zeroing Target" file.
You can read more about zeroing the Steyr Scout by clicking here.
Thanks to Blaine Fields for this target idea.
5 Round Cartridge Carrier Looseness Modification
Several correspondents have reported that the butt stock cartridge carrier does not hold the cartridges tight enough. Several folks have suggested lightly roughening the stock side inner surface of the hole and putting a small bead of silicon caulking compound on that surface. Allow to dry overnight. Another fix is to "super glue" an "O" ring of the appropriate size into the large section of the cartridge hole. It may be advantageous to scrap a slight groove around the area where the "O" ring will be glued.
The factory is aware of this problem and is looking at a fix.
5 Round Cartridge Carrier Modification
The initial shipments of the 5 round cartridge carrier accessory that mounts on the butt stock were furnished with two special self tapping screws designed for use in plastic. However, the screw were too long for the front screw position and will interfere with the reserve magazine. If you shorten the screw in the front (muzzle side) to about .61" overall length any interference will be eliminated.
If you get a cartridge carrier and don't receive the proper "plastic thread" screws you can work with locally obtained screws rather than the "plastic thread" screws which are hard to obtain.
You will need to purchase 2 #8 3/4” long flathead “self tapping” screws and trim the overall screw length to not more than .615” with a Dremel tool and cutoff wheel or a screw cutter. If the screw is not trimmed it will protrude into the reserve mag well and block the follower. To fit the carrier proceed as follows.
Take off butt plate
Pop out right side stock insert. You will see two small dimples, one at each end.
Drill out each dimple with a #11 or #12 drill.
Using a #34 or #35 drill (.111” or .110”) drill out the two holes in the butt stock. (These holes were designed for the special sized screw and needs to be enlarged for the #8 screw)
Replace stock insert.
Screw the carrier to the mounting holes in the stock. It may be necessary to slightly bevel the holes in the stock to enable the cut off screws to “bite.”
Check for screw protrusion and replace the butt pad.
Cleaning Rod Guide![]()
Brownells has a Steyr Scout (SBS action rifles) cleaning rod guide. It is listed as "#749-002-885, . Steyr Scout / SBS - 825." The cost is $19.99 plus S&H.
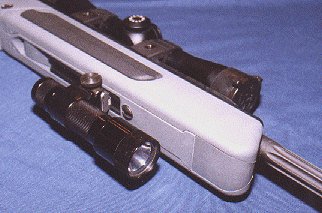
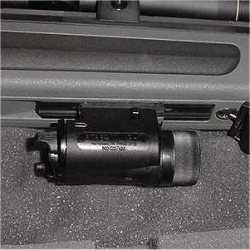
The Leopard Light
The "Leopard Light" is a combination of a special adapter that mounts to the UIT rail under the forearm of the Steyr Scout along with a Sure-Fire 3P (which works best) or 6P light. The adapter is STANAG 1913 compliant and uses standard "Weaver" type rings to hold the light or other accessories (use your imagination). With the mount in place there may be interference with the bipod and the mount knob and the sling may not be useable. For best results you want the narrow locking knob style Weaver ring, or any ring that is only that wide at the base. Position the mount far enough aft that you can get the sling swivel on and off without interference. At that point, you should have bipod clearance. If not, move the light mount aft in small steps until you do.
The best rings and the cheapest, are the oldest style Weaver ring, that have a thin flat disk that took a quarter to tighten. It protrudes less than any of the other knobs they put on over the years. This knob showed up again a few years ago, however, there were some made with a little knob that stuck out too far. Burris Z-rings work great if you don't need a quick detachable set up as do the Redfield two screw on the base rings. Another recommended option are the Leupold Rifleman Vertical Split Rings (Part no. 55850).
 |
 |
|
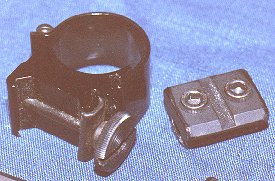
| Leopard Light mounted on Steyr Scout | Leopard Light mounting system |
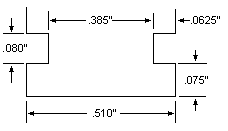
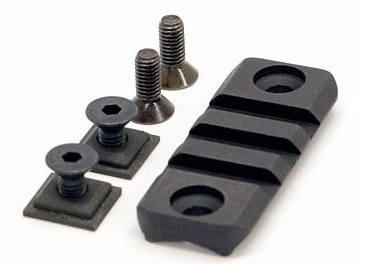
The adapter listed for $30 and was available from Medesha, PO Box 367, Apache Junction, AZ 85127 ( 480-986-5876), but he seems disinterested in making them now. The solution that most folks have resorted to is to order a .650" high flat aluminum Weaver universal base from Brownells (stock # 122-141-650) which retails for $19.95 and then make their own with the help of a friendly machinist. If you want steel the stock # is 578-000-001 and it retails for $29.75 unblued. Make the adapter about 1" long and cut a "Weaver" cross slot in the middle of the block. Drill and tap for 2 #6-49 or #8-48 screws per the photo above.
 |
|
Nominal dimensions to fit UIT rail. |
The Sure-Fire lights can be obtained from LPS-Lagger Professional Services/Tactical & Personal Security Supply at their web site: http://www.lagger-pro.com. They can also be reached at 1.888.511.7322 or via Fax at 1.510.795.8680. Tell them I sent you.
Photos © copyright John Slater & Hazel the Cat, 1999
I have also been informed that the ITI Tactical Light mount for the AR15 will fit the UIT rail but it needs a spacer . It is available from http://store.botachtactical.com/insightte.html
 |
 |
Tip and photos courtesy of Dave Schullery
VersaPod UIT to Picatinny adapter will work with the Scout without a spacer and will allow the mounting of any normal weapon mounted light. The part # is 350-601 and can be found at http://stores.versapod.com/uit-rail-anschutz-to-picatinny-rail-bipod-adapter/ and also on Amazon.
Thanks to Brian Vanderbunt for this tip.
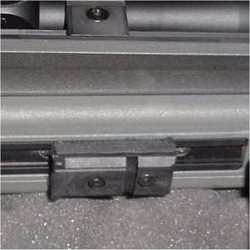
Another idea uses a Warne Picatinny side mount adapter available from Brownells. It needs a slight modification to fit the cross lug despite its being a "Picatiny" accessory, which is obvious when you try it. It apparently makes a good flashlight base that will allow you to mount the light along side of the scope. Brownells part number is 947000095 and the cost is about $25.
 |
 |
Thanks to Steve Clifford for this tip.
I finally found the solution. B&T Industries has a Picatinny rail adapter designed to fit the UIT slot on the Steyr Scout. It provides a 2" rail and runs about $35.
See http://www.accu-shot.com/catalog_new/accessories/79-bt28-afar-kit.html for details. Works with the Atlas bipod.
Harris also offers their #6 bipod adapter that fits the UIT rail.
Thanks to John L. for these updates.
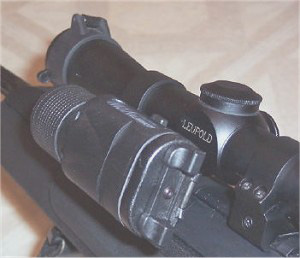
The Leupold Scout Scope Sighting Trick
The reticle of the factory supplied Leupold scope sight utilizes a very thick crosshair and is designed for very rapid acquisition under all conditions. In the field this works just fine. However, when shooting from the bench for group size the thick reticle makes precise and consistent hold difficult because the cross hairs cover such a large area. To aid in precise aiming for testing purposes use the intersection of the vertical and horizontal cross hairs as your point of aim.
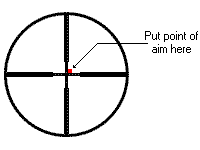
Note: If you want to have the "standard" reticle installed you can contact Leupold who will install any reticle you like from their selection for $47. Click here for more information.
Stock Spacer Removal
The adjustable length of pull makes it easy to adapt the Steyr Scout to your personal likes. (Most folks find it handles very fast with only one or no spacers.) However, the butt plate and the spacers fit very tightly and can be difficult to remove if you don't have the knack. Try this tip. Find a Phillips head screwdriver who's shaft will just slide into the hole on the heal of the spacer. Slide it in as far as it will go and then gently pop the spacer/butt plate off of the stock. Works like a charm! (A machinist's drift punch of the same diameter also works nicely.)
Firing Pin Spring Tension Adjustment
The images below explain the firing pin spring adjustment on the Steyr Scout. The factory position is the middle setting. To increase the firing pin spring tension, first disassemble the bolt according to the user's manual and then follow the steps below. Striker assemblies made since about October 1998 have 5 adjustment slots offering 2 tighter settings. Since sometime in 2005 non adjustable firing pins have been used. These have one c-clip slot and use a longer spring and have been made in both square profile and currently round profile. Sometime in 2007 they started to use a round, non-threaded adjustable round firing pin with 3 c-clip slots
Drawings and information by Elmar Bilgeri, courtesy of Steyr Mannlicher.

Striker assembly detail

Step 1

Step 2

Step 3

Step 4

Step 5
Reassemble the bolt per the manual. Note: Increasing the striker tension will increase the bolt lift force.
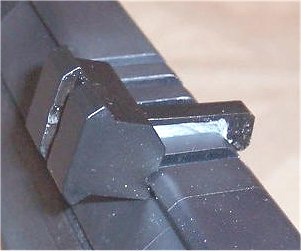
Bolt Collar Alignment
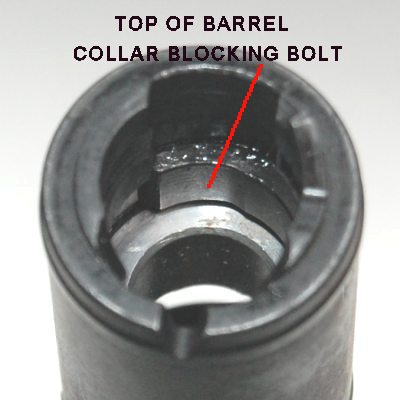
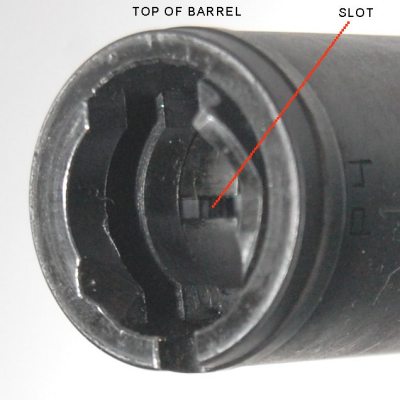
One of the features of the Steyr Scout's SBS action is the rotating collar that encircles the extractor area of the bolt when the bolt is shut to strengthen the action. It is normally self aligning but can be turned when the bolt is removed if a tight fitting brush is used to clean the chamber. If this happens the bolt won't close when it is reinserted in the action. To correct this simply stick your finger or a tight fitting patch on a rod into the breech area and rotate the collar until the lug recesses align with the receiver slots. Note that the collar has a relief cut on one side. The relief cut should align with the extractor to provide proper clearance. (This is shown where the red line points in the first picture below.) NOTE: The relief cut is not the narrow slot in the collar, which should be on the left side as viewed from the rear of the barrel.
 |
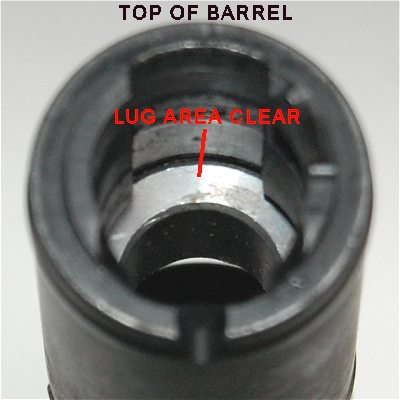 |
| Collar has rotated, blocking the bolt lugs from fully seating | Collar properly aligned. |
 |
|
This slot should be on the left side as viewed from the rear of the barrel. This will put the extractor relief cut in the correct position. |
Action Screw Tightening
The latest specifications from Steyr indicate that the action screws for both the standard Scout and the high capacity kit fitted Scout should be tightened to 77-80 in/lb. Note that the regular action screws take a 5 mm Allen wrench and the screws for the high capacity kit take a 4 mm Allen wrench. Do not attempt to use a non-metric Allen wrench as you will damage the screws.
While barrel removal requires a special tool and should not be attempted by anyone but a gunsmith trained on the Steyr Scout it should be noted that the barrel locking nut should be torqued to 217 in/lb (25 Nm).
Bolt Manipulation Technique
The shape of the Steyr Scout's bolt handle is different than US shooters are accustom to and some shooters find it awkward to rapidly manipulate the bolt. You may find the following method to work well. Try lifting the bolt with the fingers straight and parallel to the stock, thumb vertical and let the bolt handle slide into the palm of the hand curving the hand only slightly. Pull back, turn the hand slightly and push the bolt back into battery the same way.
This tip was submitted by Arne Kolstad of Oslo, Norway
Arne also mentioned some astounding bolt manipulation and shooting by their national rapid fire shooting champion. He used an AG-3 (HK) and made 30 hits in 50 seconds on helmet targets at 100 and 200 meters. Number 2, ditto, with 29 hits. Number 3 used a Krag(!) and made 27 hits. The Mausers were just a couple of points down. Worth thinking about for those who dream about a semi auto Scout. Good technique is lighter, cheaper and more interesting (not to mention more impressive) to watch.
Sling Installation
When installing the Ching sling give the top end of the sling a half-twist to the right (as viewed from the top--scope side--of the rifle with the muzzle up) before inserting the swivel into its socket. This will allow the sling to lie smoothly against the arm when mounted quickly.
Several correspondents have recently indicated that due to a design change the new production Pachmayr flush swivels are no longer interchangeable with the Millet swivels that come with the Steyr Scout. The Millett part number is: #SS00002 (1 Pair). You will need 3 swivels. Millett's web site is: http://www.millettsights.com .
Scope Lens Covers
The Butler Creek flip-up scope covers will work on the Leupold M8 2.5x scope furnished with the Scout. According to the Butler Creek list the correct part numbers are: EYE 01 and OBJ 03. However, most people have found that they need to use the EYE 03 and OBJ 05 on their scopes--possibly due to manufacturing tolerances of the caps. You will probably need to remove some material from the bottom of the rear cover. Use a Dremel tool or file to remove a small amount of material from the middle area only. Do not go all the way to the ends and use care not to go through the cover.
Butler Creek also makes a snap on cover that is basically a giant rubber band with flats on each end to cover the lenses, part number 19000.
There are no dimensional differences between the Steyr marked scopes and the Leupold marked ones. Other than the Steyr branded knob covers and the thick reticle (which is available aftermarket from Leupold for scopes with the standard reticle) they are fully identical.
This tip was submitted by Rob Blank, Keith Miller, and Derek Lee
Magazine Retention
There have been a few reports of the reserve magazine dropping out under recoil when using heavy bullet loads, particularly with early rifles. A fix is available which uses stronger magazine catch springs eliminates this problem. It does not make magazine removal any more difficult.
However, if you experience this problem there is something else you can check. The edges of the spare magazine well where the magazine catch rests was not properly shaped on some early stocks, particularly with the .376 Steyr Scouts, and may be sloped instead of square. The picture below is self explanatory.

Drawings and information by Elmar Bilgeri, courtesy of Steyr Mannlicher
| Back to Page 1 of Tips & Tricks |
| General Info and Specifications | Personal Observations | Scout Scope Specifications |
| Scout Articles In The Gun Press | The Scout "Team" | Ammo Database |
| The Big Bore Scout & .376 Cartridge | The Tactical Scout Rifle | The Steyr Mannlicher Company History |
| Back to Fr. Frog's Home Page |
Email me by clicking here.
Disclaimer
These tips are furnished with the understanding that you use them at your own risk. No warranty as to their usefulness or accuracy is expressed or implied. Neither Steyr Mannlicher, SteyrUSA, nor anyone else accepts any responsibility or blame for any damages, or if things don't work right, or if you damage your rifle in any way. Before doing any work with the rifle ensure that the rifle is unloaded and that all magazines are removed.
![]()
Updated 2018-06-10